Elena Humeniuk
PPM Consultant
IT administrators always look for flexible and helpful portfolio and enterprise management solutions. They should look as far as Microsoft Project Online. The solution offers numerous benefits that every IT manager can leverage for successful project completion. Read the article further to find out on getting started with Project Online.
Microsoft Project Getting Started
- To set up Microsoft Project Online manually, you must first sign up. You can add Project Online to an existing Office 365 account by selecting “Activate Offers” on the left menu in the Microsoft 365 admin center’s Billing section.
- The next step is to add people to Office 365’s admin center. During this step, you group the users based on how they will use MS Project Online. The roles are admins, project managers, and team members.
- The last step is setting up Project Online. Here, you are ready to start on your projects, but there are a few things you may need to work on, including setting your time zone, setting up your timesheet, and establishing a streamlined system for controlling resources and users.
While the process may seem simple, there are more configurations on Microsoft Project Online PWA to be set up. IT managers face issues that make getting started with MS Project challenging.
Getting started with Microsoft Project: how to create a project
Microsoft Project allows you to:
- Create project plans
- Build project teams
- Allocate resources
- View tasks and resources from various angles
- Monitor and measure progress
- Control and manage your budget
To start with MS Project, you must create or set up a project in Microsoft Project. First, launch Microsoft Project and go to the File > New. Projects can be created using either a preexisting template or a blank project, both of which are provided for your convenience.
Select a template, select the options per your requirements, and then hit the Create button. Afterward, you can modify the template to reflect your project’s resources, tasks, and timeline.
How to create and manage project schedule
After launching MS Project and creating a new project, it’s time to develop and manage project schedules. Below are the points which will provide you with a Microsoft Project step by step guide that will also highlight how to use MS Project to manage multiple schedules:
- Include names, timelines, and dependencies when defining project tasks.
- Prioritise activities and allocate time and resources accordingly.
- Include start and finish dates for the project in the timeline.
- Use Gantt charts to see the schedule laid out graphically, allowing you to modify the order of tasks and their durations easily.
- Mark essential moments in your project with tools like milestones and due dates.
- Maintain a record of where you stand by recording regular updates on tasks finished and resources used.
- Determine whether activities significantly affect the project schedule by doing a critical path analysis.
How to assign tasks in Microsoft Project
The next part of the MS Project tutorial is related to the assignment of tasks and resources. Microsoft Project’s Gantt chart view can be used to assign tasks when a timeline has been established and resources have been allocated. MS Project’s ability to estimate how long it will take an individual to accomplish a task, given their schedule, is a major plus. If you need to get an essential part of the project done quickly, you can divide it among several individuals, and Microsoft Project will calculate how long it will take.
To assign tasks with MS Project Online:
- Select the Details checkbox in the View tab’s ribbon.
- The Task Form needs to show up in the screen’s bottom half.
- If the Task Form option doesn’t automatically show, access the drop-down menu in the Details box.
- Selecting an item in the Gantt chart will bring up the task in the Task Form’s Name field.
- Select a resource from the drop-down menu by clicking the box next to Resource Name.
- To continue, select OK.
How to create Task Dependencies
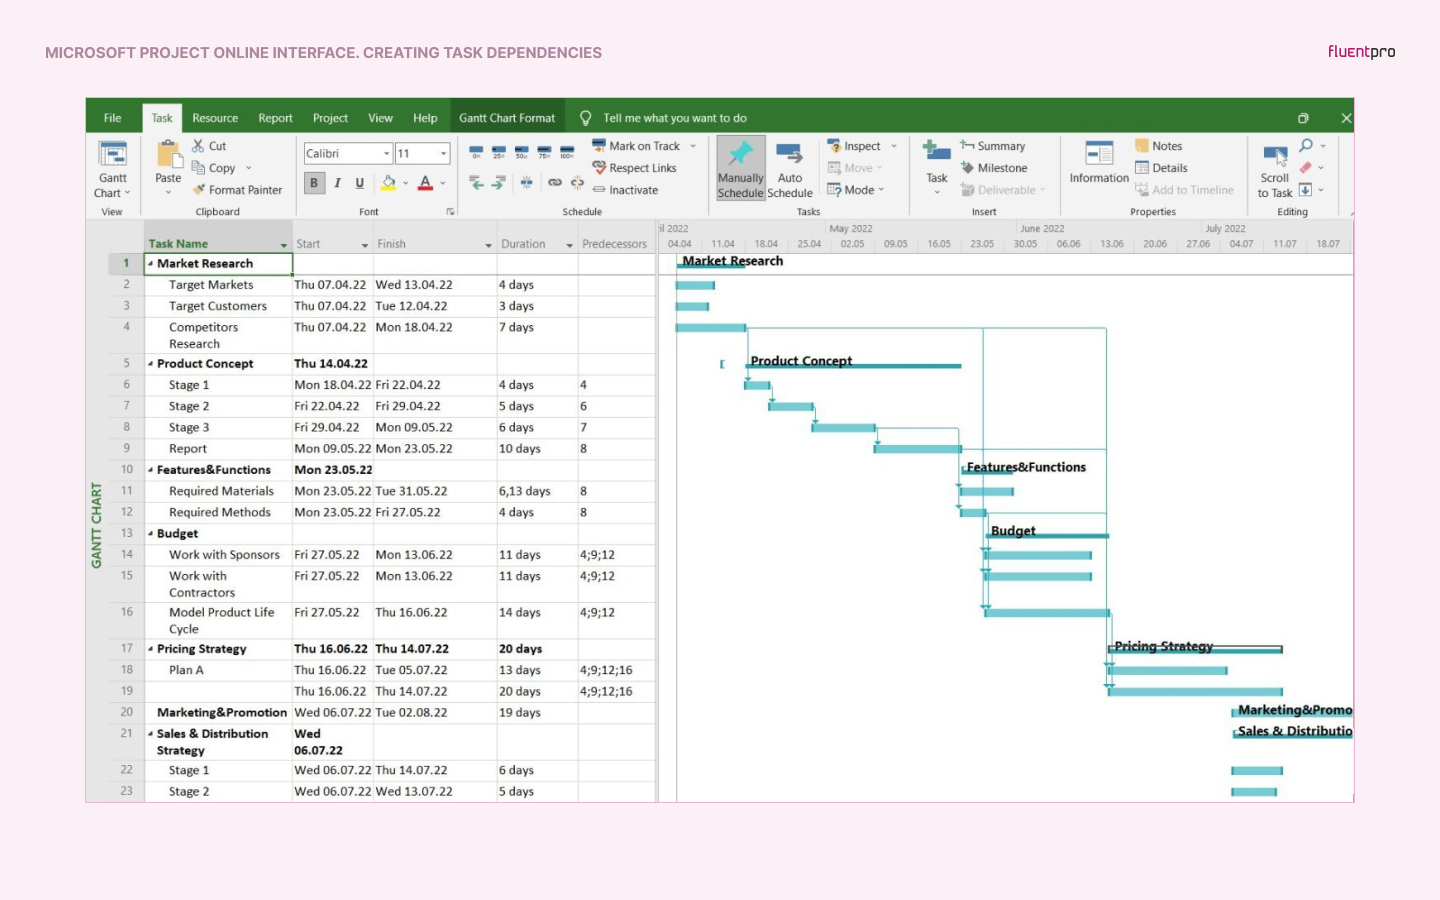
Dependencies occur when one task must be finished before moving on to the next stage. In Microsoft Project, link any two tasks in the Gantt chart view to establish task dependencies. When two tasks are linked, any modifications to one impact the other.
In the menu bar, select the Task tab and decide which two tasks in the list you wish to connect. After selecting the first task, hold down the Ctrl key and click the second. To link the tasks, click the chain icon in the ribbon. On the Gantt chart, an arrow connecting the items will show up.
How to create Milestones in MS Project
Milestones identify significant events in your projects. Managers or team members can add milestones to indicate the conclusion of a particular phase, an approval stage, any momentous occasion, etc.
In Microsoft Project, you can add a milestone by specifying the task with a specific duration:
- To incorporate a milestone lasting a day or longer, choose the desired milestone from the Task Name column and right-click on the milestone task.
- To view the Task Information window, click Information.
- To adjust the Duration to one day or longer, click Advanced.
- In the advanced options, check Mark task as a milestone, then click OK to proceed.
How to create a timeline in MS Project:
- In Microsoft Project, make a list of tasks and the start and finish dates for each to create a timeline.
- Next, include those tasks in the schedule.
- Click View in MS Project, then choose the Timeline option from the Timeline box to create a timeline.
- By right-clicking on a task and choosing Add to Timeline, you can add a task to the timeline after selecting it.
You can follow the same procedure to add each task to the timeline.

Toolbar and Icons in Microsoft Project
This MS Project quick start guide is designed to help beginners become familiar with its interface. You can select the desired view, such as a Gantt chart, calendar, network diagram, task use, tracking, etc., using the toolbar option in the View menu. Additionally, there is a Toolbar option under View that, when selected, opens a second window with additional opportunities to the right. You can adjust the Standard and Formatting parameters to view what you wish to see at any given time; these are the default settings.
A popup screen hint appears when you hover your cursor over the toolbar icons. This can be useful for getting acquainted with Microsoft Project’s visual language. Anyone familiar with computers should be able to recognize the icons: New File, File Search, Print Preview, Spelling, Undo, etc.
You can customize your toolbar by using the small down arrow and small double arrow to the right of the primary toolbar.
What challenges do IT managers face?
When it comes to getting started with Microsoft Project, IT managers face significant problems.
- Configuring Microsoft Project Online is time-consuming, especially if you are a part of a small department or team. Teams typically spend many days figuring out all the aspects required to configure Microsoft Project Online through trial and error effectively. It includes shifting settings from development to staging and production environments and rectifying typos and errors that arise by chance.
- The process of configuration is quite complex, requiring adequate planning. This is particularly true if you don’t have Project Online experts in your department or team.
- High cost in case you choose to hire a PPM consulting firm. This is especially true if your team comprises a few members who can’t configure Project Online PWA or if you are engaged in other tasks.
It would help if you had a solution to help you start with Microsoft Project immediately.
An incredible team of experts is here to help you
The FluentPro team has more than ten years of expertise in simplifying Microsoft Project Online usage. FluentPro offers the best outcomes since we have in-depth knowledge of platform restrictions and workarounds. Along with a comprehensive range of implementation services, including migration, roll-out, architecture, and maintenance, we provide a solution for quick configuration and Project Online implementation.
FluentPro can install PWA settings fast and get your Project Online PWA up and running with Quick Start for Project Online service.
Quick Start for Microsoft Project Online
FluentPro Quick Start for Project Online provides fully managed deployment of PWA configuration, architecture design, environment creation, customized development, connection with Office 365 groups, onboarding sessions, and full support during or after the implementation.
When using Microsoft Project quick start solution, organizations get a fully configured environment in a few days. This service reduces all time-consuming processes and manual work. In addition, you can get integration with over 50 ready-to-use reports on portfolio, project, and resource levels.
Contact us for the best Microsoft Project Online configuration tool
The FluentPro team will help you access Microsoft Project Online quickly and effortlessly. Organizations can get a ready-to-use environment without extra time or additional development. Getting started with Microsoft Project is a breeze with FluentPro.
Enjoy benefits from using Quick Start for Microsoft Project Online
Your business will enjoy immense benefits by managing PWA configuration with FluentPro Quick Start for Microsoft Project Online:
- Time saved on Microsoft Project getting started
- Fully managed deployment completed in a few days
- Integration with Office 365 groups
- More than 50 ready-to-use reports for a project, resource, or portfolio
- No need for additional development
- 100% assurance of high ROI
- Your Project Online workspace is available for use
- User onboarding training and complete expert support
Contact us today
to reap the benefits of Quick Start for Project Online


